
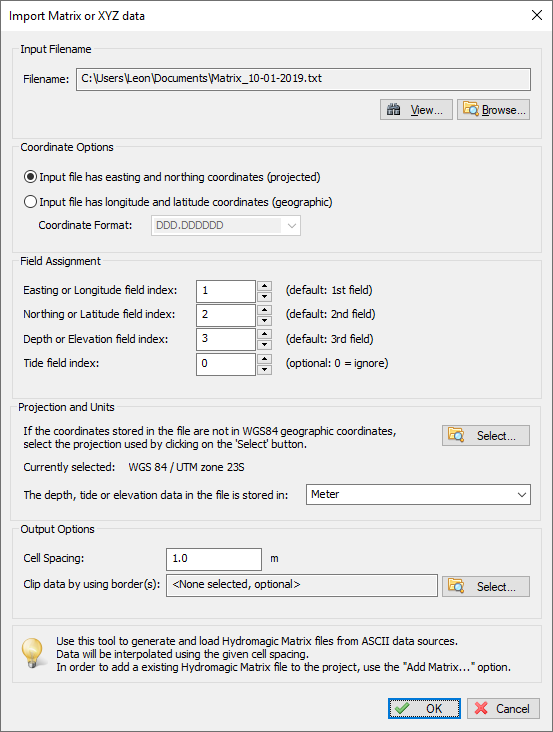
Import Matrix from ASCII XYZ data
In Hydromagic, a matrix is a collection of regularly spaced depths, which can be projected over the map as color or text. Such data is also referred to as a digital terrain model or DTM.
The software allows you to import matrix data from other sources through an ASCII file. A third party matrix file can be imported for further processing in Hydromagic, as background map or to use in volume calculations.
The import tool allows you to import the data from various ASCII formats. During the import process it can perform coordinate conversion, unit conversion, resampling (up and down sampling) and clipping.
Starting the importing tool
To start importing matrix data, start the tool by selecting "Import Matrix..." from the "File" => "Import" menu. Please note that a licensed version of Hydromagic is required in order to use this tool.
Use the "Import XYZ Data" tool to convert ASCII files into matrices.
Select and preview the source data
The first step is to select the data that is going to be imported. You can select the source file after clicking the "Browse..." button. Next, you can click the "View..." button to analyze the data. Use this option to determine which data layout is used inside the file. This info is required for the next step.
Looking at the source data, please determine which coordinate format is used, what the order of the fields is and which projection and units are used.
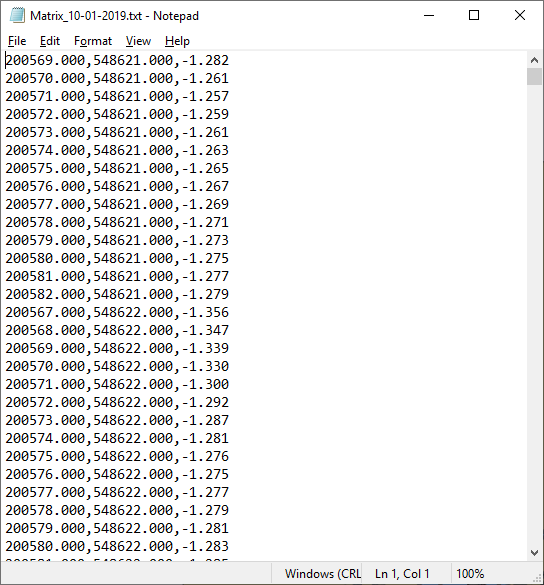
Click the "View" button to open the selected source file in Notepad.
Coordinate Options
While in most cases the data source will be in easting and northing coordinates, the data might be in geographic coordinates sometimes. When this is the case, click the "Input file has longitude and latitude coordinates" and select the position format from the drop down list.
Field assignment
The field assignment options are used to indicate which field is what. You can determine the field numbers by looking at the source data. Please note that the first field is field number one. A field number of zero indicates "Not in use" and can only be selected for the tide level.
In the example above, you would select 'one' for easting, 'two' for northing and 'three' for the depth, or in this particular case ,the elevation.
Projection and Units
When the projection of the imported data, or the depth units are different then the ones used in the current project, please select them in this section. During the import, coordinates and depths will automatically be converted. When the source coordinates are geographic, select "WGS84" as projection.
Cell Spacing
The XYZ data will be converted to a regularly spaced grid or matrix. You have to specify the distance between the cells here. The cell spacing will be the same in both horizontal and vertical direction. Hydromagic will generate a new grid using this setting by creating a so called TIN (Triangulated Irregular Network) model of the input data. The TIN model is used to interpolate depth or elevation values at the cell positions.
Boundaries
In Hydromagic, boundaries can be used do define a shoreline, a clipping area or an island. When an island or clipping boundary is selected, it will be used to determine which area's should be filled with source data and which are not.
To select an area to fill with the source data, click the "Seclect..." button to select one or more boundaries to use as clipping area. The setting is optional. When no boundary has been selected, all data will be imported.
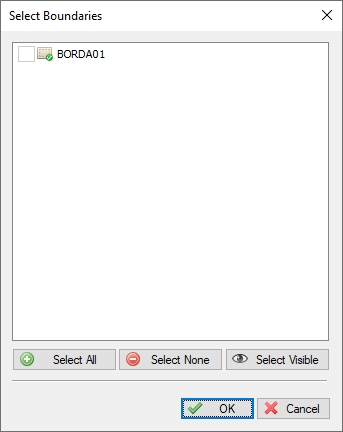
Select one or more boundaries to clip the imported data.
Generating the matrix
Finally, click the "OK" button to start the process. It should take a couple of seconds, you can watch the progress in the status bar of the main window. After generation, you will notice the matrix has been added to the project. Depending on the configuration, the newly generated matrix will be drawn over the background map. When it is invisible, please check the drawing order.
Video Tutorial
The following YouTube video tutorial shows how to import matrix data from third party software. Click below to play the video. When you like the video, please click the like button and subscribe so you will receive an update when new video tutorials on Hydromagic are uploaded.
Hydromagic allows you to import matrices in different ASCII file formats.