
Interval Logging
The interval logging functionality allows recording incoming data at a preset interval in addition to recording raw data. These log files are written in ASCII CSV (Comma Separated Values) format so that they can be read directly into Microsoft Excel, for example. Here are some examples of scenarios where an interval log file can be useful:
- Storing water quality sensor information;
- Storing the ship's route;
- Storing certain points of a pontoon, for example the position of anchor points or a crane;
- Logging the activities on the ship from day to day;
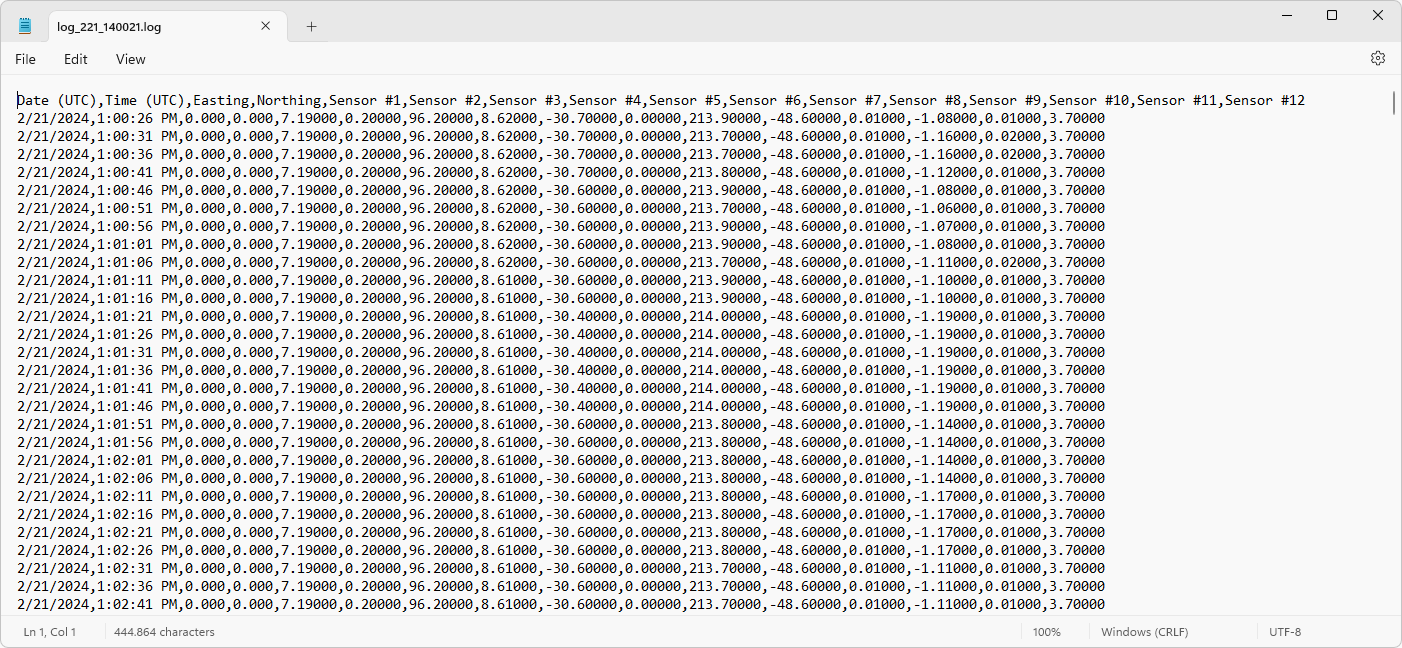
Example of a Hydromagic interval log file opened in Notepad.
Configure Interval Logging
With the default configuration, interval logging is disabled. When pressing the record button, only a raw data file will be recorded. To write interval logging files simultaneously, the interval logging functionality must first be configured.
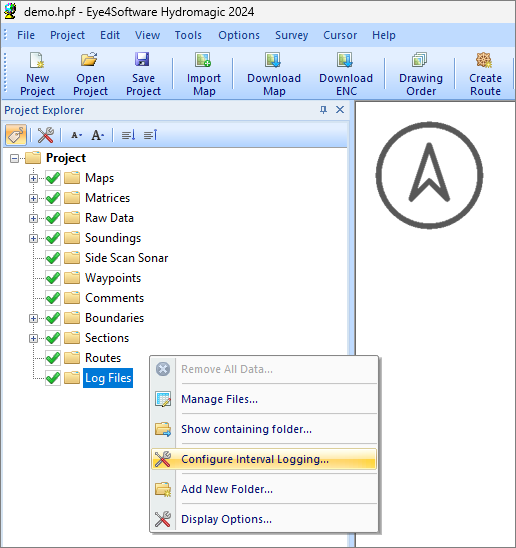
The configuration of the interval logging files can be found under the "Log Files" section in the "Project Explorer". If the 'Project Explorer' window is not visible, make it visible by selecting the 'Project Explorer' option from the 'View' menu. When the "Project Explorer" is visible, start the configuration of interval logging by right-clicking the 'Log Files' folder, and then selecting 'Configure Interval Logging...'.
The configuration of the interval logging files can be found under the "Log Files" section.
Selecting data to record
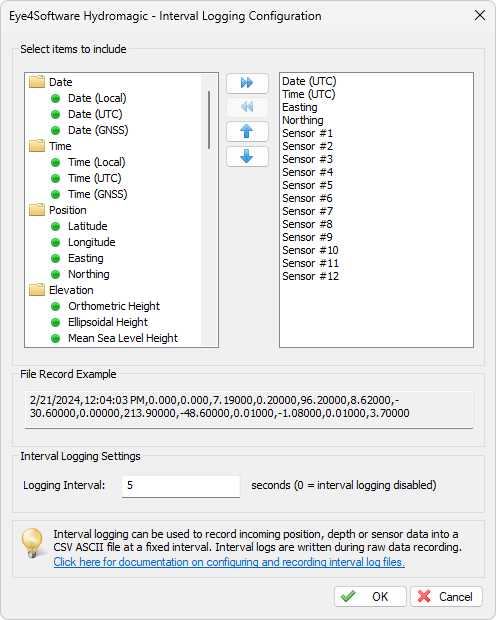
In Hydromagic it is possible to compose the contents of the lines written in the CSV file. You can choose from a variety of data fields, including: Date, time, position, altitude, depth, speed, heading, motion, user defined points on the ship and data from different types of sensors. To add items to include, select them in the left list and click the button with the arrows pointing to the right to include them in the list. To remove items from the list, select them and click the button with the arrows pointing to the left. Using the up and down buttons you can change the order of the fields in the CSV file.
Use the arrow keys to include or exclude data fields.
Check the resulting line of data by looking at the example in the 'File Record Example' setting, which is updated every second with the latest selection of fields and incoming data. In this example, the time, date, position, and sensor records are written to the file.

The "File Record Example" section shows an example of the composed record.
Selecting Logging Interval
The "Logging Interval" setting sets the interval at which a new line of data is written to the interval logging file. The minimum time interval is one line per second. To disable this functionality completely, simply enter the value "0". It is possible to change the interval while recording the data. When the new interval is confirmed by clicking the OK button, it will be applied immediately.

Setting the interval to 0 disables logging.
Start Recording
To start recording to an interval log file, press the main toolbar. The file will be created using an unique filename and will automatically appear in the "Project Explorer".
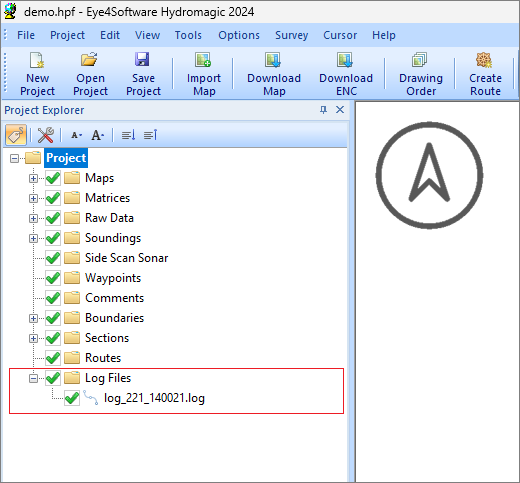
New interval log files will automatically appear in the Project Explorer.
Manage files
To show, rename, or remove interval logging files, use either the 'Project Explorer' or open the "Interval Log File Manager". The "Interval Log File Manager" can be opened from the "Project Explorer", which is normally on the left side of the main program window.If not visible yet, select "Project Explorer" from the "View" menu, locate the "Log Files" folder in the "Project Explorer", and right-click this folder with the mouse. From the context menu which appears, select the "Manage Files..." option.
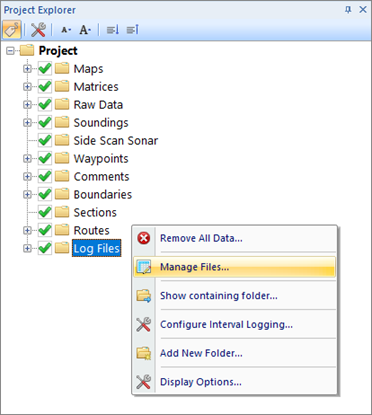
Right click the "Log Files" folder and select "Manage Files...".
Autosave option
To prevent data loss, for instance, due to a PC crash or AC power failure, it is recommended to use the 'AutoSave' option. When this option is enabled, all project data (including raw data and sounding files) will be saved to disk at the specified interval.
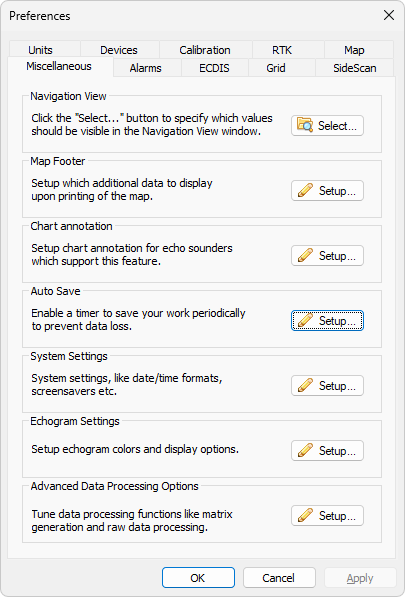
The autosave option is located at the "Miscellaneous" tab.
To change the autosave option, select "Preferences..." from the "Options" menu, and click the "Miscellaneous" tab. You will see an 'Autosave' section at the bottom of this window. Now click the "Setup..." button in this section. Enable the checkbox if you want to use autosave, and enter an interval (minimum 1 minute). Click the "OK" button to apply the changes.
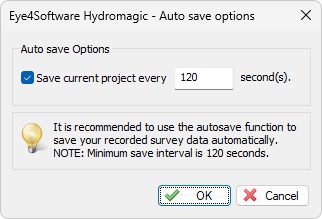
Make sure you enable the autosave function to prevent data-loss.
Manually saving raw data
Raw data files can be saved at any time by just clicking the "Save" button in the toolbar ( ). It will be saved into the "RawData" folder of your project.