
Monitoring and recording dredging progress
The Hydromagic Dredging package is a module shipped with Hydromagic that allows you to monitor dredging progress. It needs a separate license, and can be purchased with or without the Hydromagic Survey software. The software can log the dredging file as a series of points or by updating an XYZ matrix file. Please note that this feature needs additional sensors to be installed (inclino meters). Currently the software works for cutter, hopper and backhoe / excavator dredges.
Depth vs Elevation
Dredging data can be monitored in either depth or elevation mode. In depth mode, the absolute dredging depth below the waterline is recorded. This option must only be used when the water level is constant. When the water level is variable (tides), the dredging depth is no longer useful, since the tide level isn't logged with the depth (only in the log files, not the matrix).
When the water level isn't constant, always use elevation mode. In this mode the dredging depth is stored as an elevation relative to the local height datum (for instance NAVD88). To use this mode, the correct water level has to be entered, or measured with RTK. More information on how to determine the water level with RTK can be found here. To enter the water level manually, select the "Set Tide Level..." option using the manual tide plugin.
Creating an empty matrix
When recording dredging data, data can be stored in a user defined log file as well as in a matrix. A matrix is basically a file that contains XYZ coordinates with a fixed cell distance. During the dredge process the cells will be updated with the maximum dredging depth and displayed as map overlay.
Before we can update a matrix with our data, we have to create an empty one. To do so we first have to specify the area to cover. This should be done by drawing a boundary first.
When the boundary has been created, make sure the "Project Explorer" is visible ("Project Explorer" from the "View" menu) and right click on the "Matrices" folder.
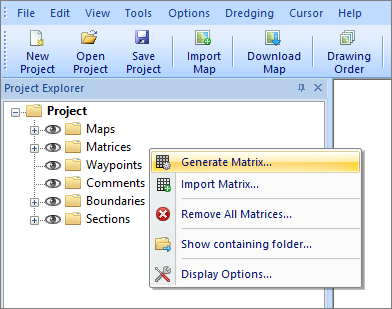
Select the "Generate Matrix..." option from the popup menu to start a new matrix file.
From the popup menu, select the "Generate Matrix..." option. The "Generate Empty Matrix" dialog appears:
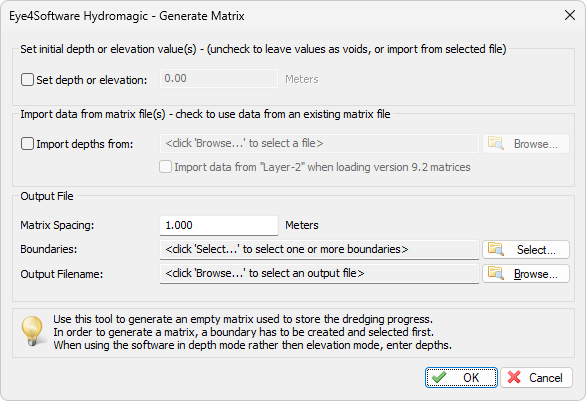
Generate an empty or pre-filled matrix file which can be used to record dredging depths or elevations.
The matrix file used in Hydromagic has three layers. It is possible to set a preset value in one of the three (pre dredge, dredge and post dredge) layers. To simply monitor dredge progress, just leave the boxes unchecked so all layers are filled with void values.
You can adjust the space of the cells. A cell spacing of 0.5 means that dredging data is stored in a 50 x 50 cm grid. You also need to select a filename and the boundary you created to define the area for the matrix. When you are happy with the settings, just press "OK" to proceed with matrix creation. After successful creation the new matrix will be displayed in the project explorer.
Start recording
When you are ready to start recording, just click the "Record" button ( ) to start recording the XYZ positions of the dredge. Log data files are generated every time you start a new recording. Matrix updating will be performed on the matrix which is set as "Active" in the "Project Explorer".
To pause a recording without generating a new log file, just click the "Pause" button ( ) instead. When clicking the pause button again, the recording will resume writing data to the same log data file.
During recording, log files should increase in size, display depths on the map and the matrix file should update when the vessel is moving and the dredging depth increases. If nothing is logged, or no matrix updates are visible, please perform the following checklist:
- Is the dredging layer of the matrix selected? (Button with the blue bar in the middle.);
- Is the dredging depth more than the minimum value to be logged in "Preferences" => "Dredging";
- Is the dredging depth more than the preset value entered during the matrix creation (N/A when void was selected);
- Are any alarms triggered as this can pause the recording of data;
- Is the dredging position outside the boundary used to generate the matrix;
- Check the log and matrix display options in the "Project Explorer";
- Are there color ranges defined for the dredging depths recorded;
- Is the matrix used for recording set as active (right click => "Set Active" in project explorer);
- Are the dredging depth and vessel position displayed in green in the "Data View";
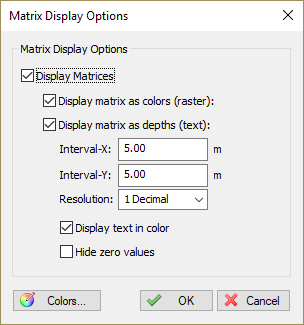
Matrix Display Options
There are more ways of showing the matrix on the map. You can for instance display it as both colors and text at a specified interval.
It is also possible to not show it (and just use the matrix to export data), to show it with colors only (using the defined color ranges) or to show its depths as text.
To change settings on how the matrix is shown,right click the "Matrices" folder in the "Project Explorer", and select the "Display Options..." option from the popup menu.
A dialog with all matrix settings will be displayed. It should look like the screen shot below:
Autosave option
To prevent data loss, for instance due to a PC crash or AC power failure, it is recommended to use the "AutoSave" option.
When this option is enabled all project data (including matrix data and log files) will be saved at the specified interval.
To change the autosave option, select "Preferences..." from the "Options" menu, and click the "Miscellaneous" tab.
You will see an "Autosave" section at the bottom of this window. Now click the "Setup..." button in this section.
Enable the check box when you want to use autosave, and enter an interval (minimum 1 minute). Click the "OK" button to apply the changes.
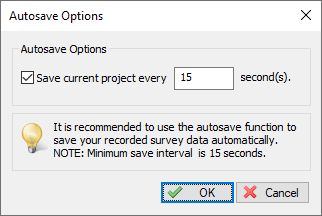
Use the auto save option to prevent data loss.
Manually saving dredging data
Log files can be saved at any time by just clicking the "Save" button in the tool bar ( ).
It will be saved into the "Logs" folder of your project.
).
It will be saved into the "Logs" folder of your project.