EchoLogger Plugin
The EchoLogger plugin is a plugin with graphical user interface designed to control your EchoLogger EU400 or D24 device.
When loaded it also transfers depth, motion and echogram data to the Hydromagic application.
Loading the EchoLogger plugin
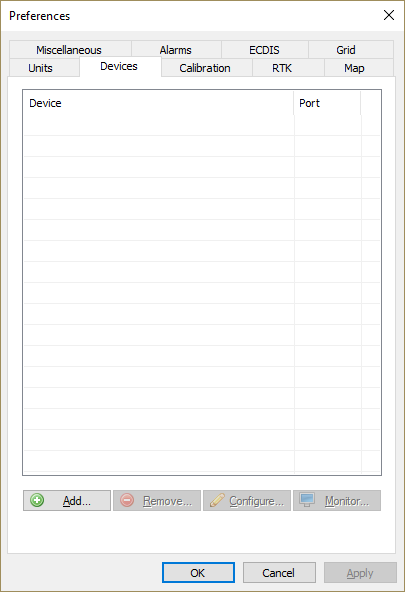
To load this plugin, open the preferences window by select 'Preferences...' from the 'Options' menu.
In the window that appears, select the "Devices" tab. Next, click the 'Add...' button.
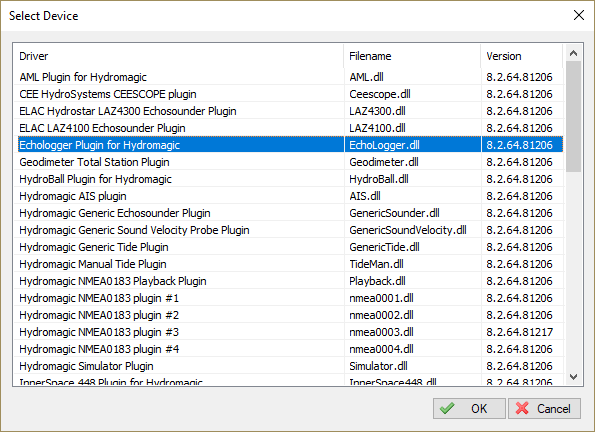
A list of available plugins will be displayed. In this list, select the "EchoLogger Plugin" and click "OK" to load and display the plugin's user interface.
Configuring the EchoLogger plugin
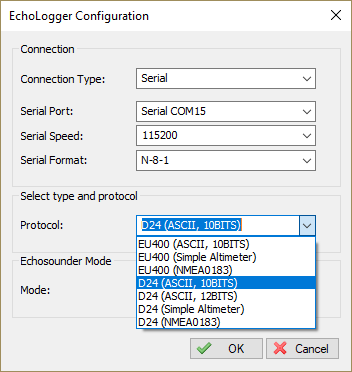
When the plugin loads, a dialog with some required settings will appear first. You have to set the communications options, echo sounder model and the data transfer protocol to use.
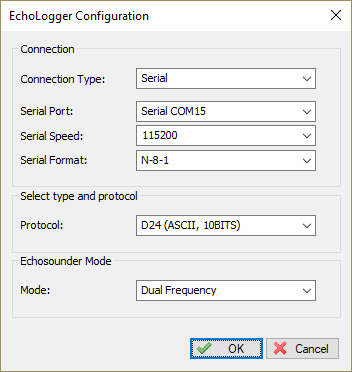
Communications settings
When using the default configuration, the echo sounder connects with the computer using an USB cable.
When plugged in, a virtual serial port will be created in Windows and you have to select this serial port.
The serial speed is 115200 bps when factory settings are used.
The EchoLogger also supports higher speeds like 230400, 460800 and 921600 bps.
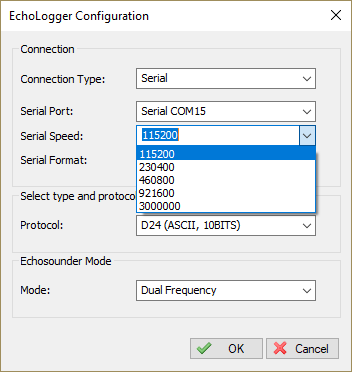
When a high sample and data interval is used it is recommended to use one of these higher speeds.
We will discuss how to setup the sounder for this speeds in the next chapter.
Changing the EchoLogger's serial speed
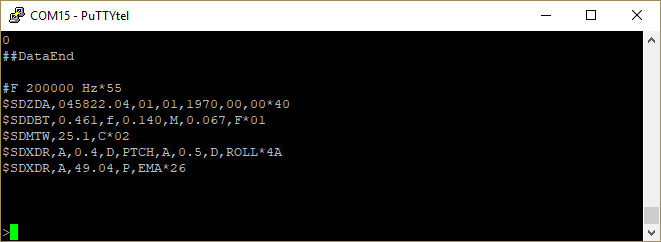
To change the speed of the EchoLogger's serial port, you need a piece of serial terminal software like Putty.
A lot of serial terminal software packages can be downloaded free of charge from the Internet. In this example we will use Putty.
When you installed Putty, first open a serial connection to the echo sounder with the default serial port speed which should be 115200 bps.
Make sure Hydromagic has been closed or the plugin has been removed, otherwise the port will already be opened.
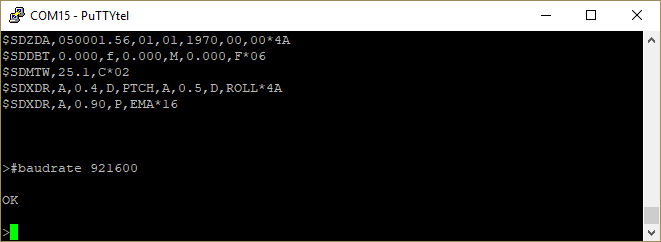
First we have to set the EchoLogger into command mode: When data comes in, press enter until the > sign appears on a new line and the data stops coming in.
At this point enter one of the following commands, depending on the desired speed:
- #baud rate 115200 <ENTER>;
- #baud rate 230400 <ENTER>;
- #baud rate 460800 <ENTER>;
- #baud rate 921600 <ENTER>;
When the command succeeds, the echo sounder will send back "OK" on a new line.
To apply the new baud rate, issue the '#reset' command and disconnect the terminal software.
You should now be able to use the echo sounder with the plugin using the newly selected serial speed.
Select echo sounder model and serial protocol
At this moment we have tested the EU400 and D24 echo sounders, but other EchoLogger models should work as well.
Each model has another set of serial protocols that can be used. You have to select the desired protocol in the plugin configuration.
Which protocol you should use depends on which data you want to retrieve from the echo sounder.
Binary protocol
NOTE: Not supported yet. Recommended protocol when transferring echogram data. When not (yet) available use the ASCII protocol instead.
ASCII protocol
When the ASCII protocol has been selected, all data will be transferred to the Hydromagic software. This includes depth, motion, temperature and echogram data.
The sampled return data can be sampled as 10 or 12 bit data values depending on this setting.
NMEA0183 protocol
When the NMEA0183 protocol has been selected, the echo sounder will transfer depth, motion and temperature data to the Hydromagic software.
Echogram data needed to display and store full water column data won't be available.
When you do not the echogram data, use this option to reduce the amount of data transferred.
Simple altimeter protocol
This is the most simple data transfer protocol available. Only the digitized depth is transferred.
There is no real need to use this option, when no echogram data is needed, use the NMEA0183 option.
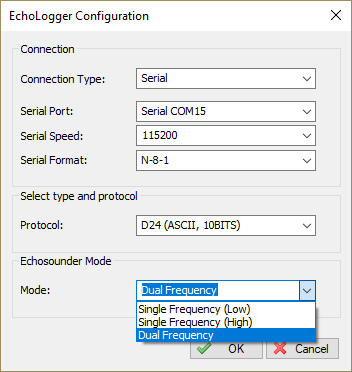
Select echo sounder mode
This option is only needed when using a dual frequency model like the EchoLogger D24 revision 2.0 and higher.
You can select which frequency you want to use, or select dual frequency mode when supported by your sounder.
Testing the sounder
When the sounder has been connected and configured, click "OK" to store the settings and start the plugin. There should be a green icon in front of the plugin's name, indicating that data is being received.
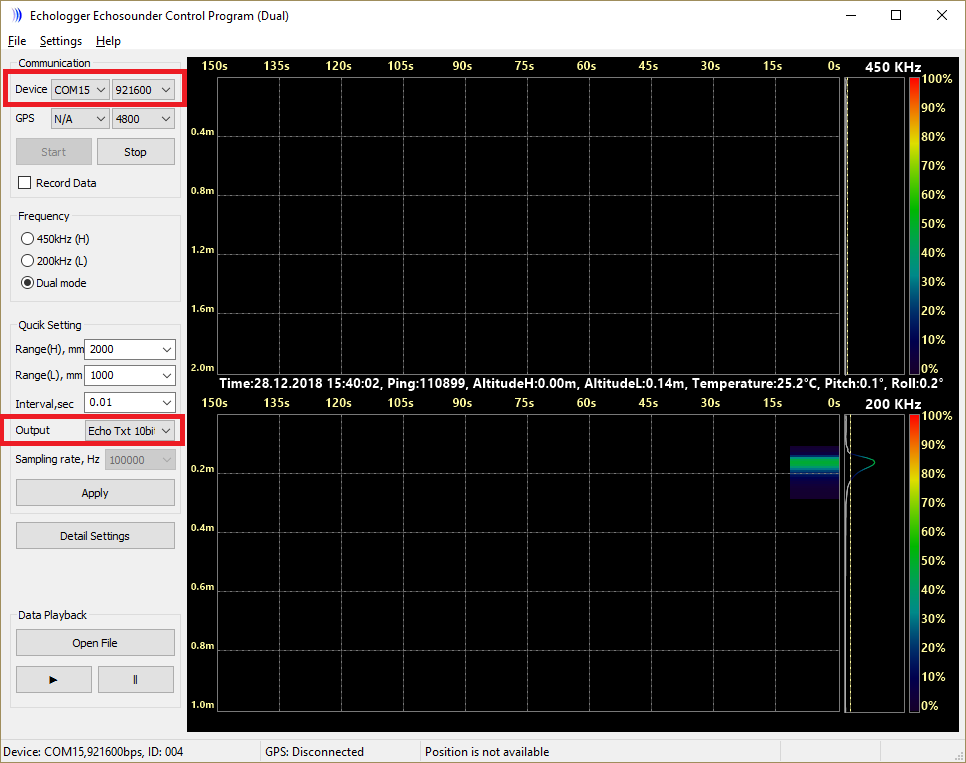
When no data is coming in, most of the times the incorrect serial port or speed has been selected. Also make sure the correct protocol has been chosen. You can check the current port, speed and protocol with the GUI application shipped with the sounder:
When data is received, you should be able to see the depth and motion sensor information in the data window.
To have a look at the echogram data, select "Echogram(Hi)" or "Echogram(Lo") from the View menu.
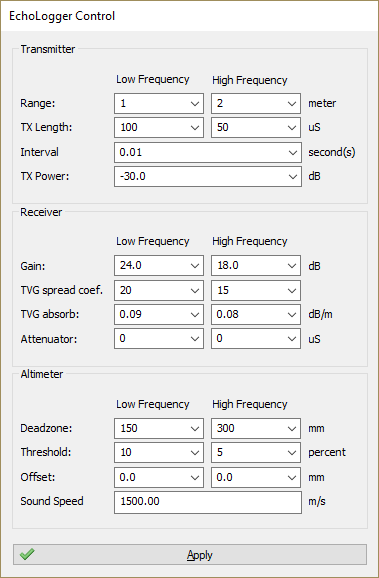
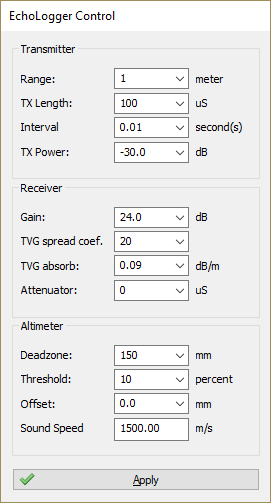
Controlling the echo sounder
When the plugin has been loaded and the communication with echo sounder has been established, you should be able to modify some settings.
For more information on the settings which can be modified, please refer to your EchoLogger manual.
Depending on the echo sounder model and the selected echo sounder mode, you will be able to control one or two channels.
Please note that applying the new settings can take a couple of seconds. During this time there will be a small gap in the collected data.