
Triton eXtended Format files
eXtended Triton Format (XTF) is a file format developed by Triton Imaging, Inc for recording hydrographic survey data. XTF is the most commonly used format for this type of information in the hydrographic survey industry. XTF supports sources including side scan sonar, shallow seismic, single beam and multibeam bathymetry, as well as associated position, time and altitude information. An XTF file consists of multiple data structures placed sequentially in the file. This allows the file format to be easily extended with new functionality.
Currently, Hydromagic can export single beam (sub-bottom) data as XTF. The following XTF records are supported when writing XTF files:
- XTFFILEHEADER;
- CHANINFO;
- XTFPINGHEADER;
- XTFBATHYHEADER;
- XTFATTITUDEDATA;
- XTFNOTESHEADER;
- XTFPINGCHANHEADER.
Starting the XTF export tool
The XTF export tool can only be started from the "Raw Data File Manager" in Hydromagic Survey. This option is not available in Hydromagic Dredging, since no raw data files are used in this application. First open the "Raw Data File Manager" by right-clicking the "Raw Data" folder in the "Project Explorer". From the pop-up menu which appears, select the "Manage Files..." option.
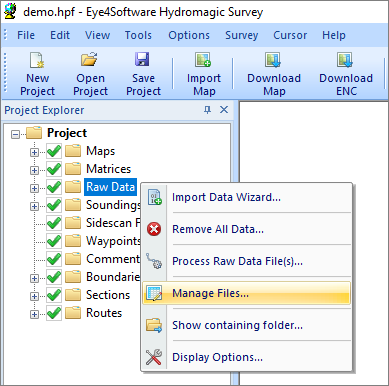
Right click the "Raw Data" folder and select "Manage Files...".
In the "Raw Data File Manager", multiple export options are offered, including HYPACK, SEG-Y and XTF format. Using the exporting tools, you can export one or more files. Select the raw data files you want to export and click the "Export XTF" button to start the XTF export tool.
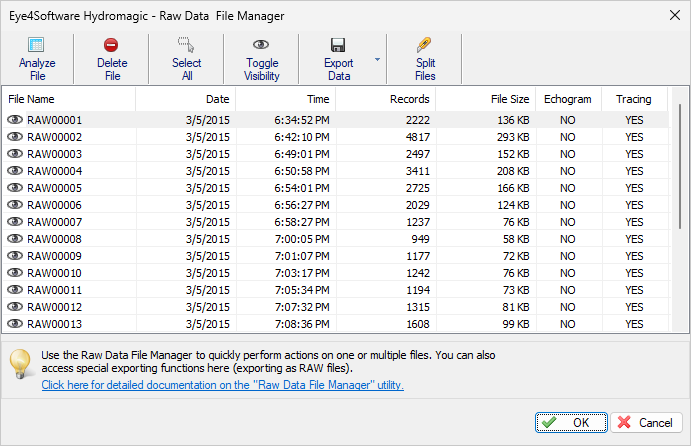
The raw data files manager shows a list of raw data files in the project.
Select output folder
Click the "Browse..." button to select in which folder the XTF files will be written. By default, the 'Exports' folder in your project map will be used unless you selected another folder previously. When one or more files already exist you will be notified. To force the replacement of existing files, check the 'Overwrite existing files without warning' checkbox.
Select file(s) to export
If you didn't select any files from the 'Raw Data File Manager' tool before opening the XTF export tool, you can select the files to export by clicking the 'Select...' button. From the window that opens, you can select the files to be exported by setting the checkboxes.
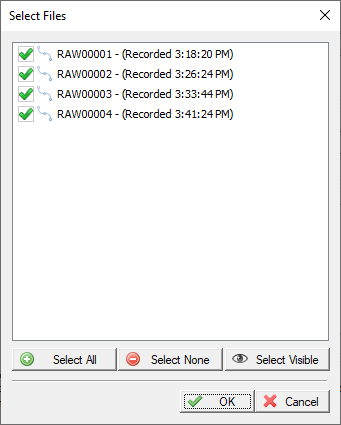
Select which raw data files will be included in the export.
Select channels to export
Check the channels you want to include in the export. You can choose the regular echo sounder channels (low and high frequency) as well as sub bottom data channels. When the echo envelope samples are available, they will be stored in the generated XTF files as well. Click the 'OK' button to start the export process. If the export did not complete successfully, refer to the 'Processing' tab of the activity view for more details on the error shown.
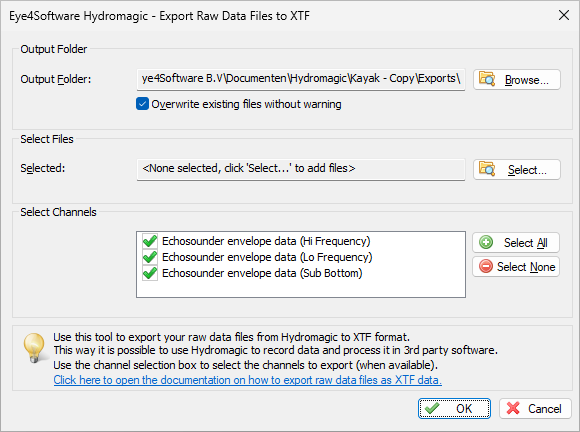
Select which channel(s) to export, and click OK to start the export process.
Video Tutorial
The following YouTube video tutorial shows how to export Hydromagic raw data files as XTF data files. Click below to play the video. When you like the video, please click the like button and subscribe so you will receive an update when new video tutorials on Hydromagic are uploaded.
Hydromagic can export raw data as XTF data files.